CPC Poker Chip Template question (1 Viewer)

123brandon

Sitting Out
Joined
Jul 18, 2022
Messages
11
Reaction score
8
Location
Florida
Hello. I am using the design tool at http://www.pokerchipdesigntool.com/ to create my custom set. They have a link to a template for laying out the chip inlay artwork. I am following the directions of the template regarding rule #1 "No text or graphic beyond the inner red circle except for a full bleed background if used." I am using the 7/8" template. My question or concern is that when uploading my inlay artwork to the design tool, the inlay art feels squished with more white space surrounding the artwork than I would like. I noticed on other custom sets that they do not have as much white space. Did they go outside of the redline while also keeping the artwork inside of the black circle of dashes that indicate where the artwork will be punched? I have tried doing this and the chip does look more visually appealing but I am scared to break rule number 1 and end up with chips that do not reflect what the design tool shows. Can anyone help me with this? I am uploading a picture of one of my designs along with a members chip I am using for a reference. I hope this makes sense. Thank you.
 

Attachments

  • IMG_7055.png
    IMG_7055.png
    1.1 MB · Views: 143
  • IMG_9278.png
    IMG_9278.png
    465.7 KB · Views: 133
  • Screen Shot 2022-07-26 at 4.51.23 PM.png
    Screen Shot 2022-07-26 at 4.51.23 PM.png
    80.9 KB · Views: 132
Good question as I've always uploaded artwork knowing that it won't be exact, and just using it to get a better feel for the overall look with the colors. Example, i know there's too much space between the words and the inlay edge here:

Screenshot_20220727-063411.png


Also if you didn't know this already, the colours in the design tool vary by different monitors so you should really get samples.
 
Hello. I am using the design tool at http://www.pokerchipdesigntool.com/ to create my custom set. They have a link to a template for laying out the chip inlay artwork. I am following the directions of the template regarding rule #1 "No text or graphic beyond the inner red circle except for a full bleed background if used." I am using the 7/8" template. My question or concern is that when uploading my inlay artwork to the design tool, the inlay art feels squished with more white space surrounding the artwork than I would like. I noticed on other custom sets that they do not have as much white space. Did they go outside of the redline while also keeping the artwork inside of the black circle of dashes that indicate where the artwork will be punched? I have tried doing this and the chip does look more visually appealing but I am scared to break rule number 1 and end up with chips that do not reflect what the design tool shows. Can anyone help me with this? I am uploading a picture of one of my designs along with a members chip I am using for a reference. I hope this makes sense. Thank you.
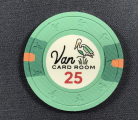
If you are uploading the image you've attached to the post, but not cropping it to the black dashed line, its going to include all of that white space and look like the art is smaller than it should be. Use the controls on the chip tool to increase its size, or export another image but crop it to the dashed line.

Looking at your inlay, it looks like you've got it setup to CPC's spec. David can confirm when you order.

Red = safe area - you can be sure anything inside of here won't be at risk of being trimmed off
Dashed line = trim line. This is where the inlay will be cut/punched.
Green = bleed area. If you are using a background image or a colour other than white, extend your art to this line to ensure full edge to edge printing.

In your case you don't need the bleed are since you are using a white background.
 
Hey thanks for the response. I figured out last night that I was overlooking the zoom,pan,tilt tools on the design page. I’m making progress now. Thanks again for the response.
 
If you are uploading the image you've attached to the post, but not cropping it to the black dashed line, its going to include all of that white space and look like the art is smaller than it should be. Use the controls on the chip tool to increase its size, or export another image but crop it to the dashed line.

Looking at your inlay, it looks like you've got it setup to CPC's spec. David can confirm when you order.

Red = safe area - you can be sure anything inside of here won't be at risk of being trimmed off
Dashed line = trim line. This is where the inlay will be cut/punched.
Green = bleed area. If you are using a background image or a colour other than white, extend your art to this line to ensure full edge to edge printing.

In your case you don't need the bleed are since you are using a white background.

Don’t you have a post with links to templates that you created somewhere here? I found the CPC templates very confusing and thought I found yours only afterward.

But as you mentioned. David will QC them.
 
Thanks for the reply. I feel stupid but I figured out that off to the right side is a tool to zoom,pan, and rotate your artwork inside of the chip once it is uploaded. Nice chip design btw.

I didn't know that. You feel stupid? Have u been using it for about 15 years like me? ;)
 

Create an account or login to comment

You must be a member in order to leave a comment

Create account

Create an account and join our community. It's easy!

Log in

Already have an account? Log in here.

Back
Top Bottom