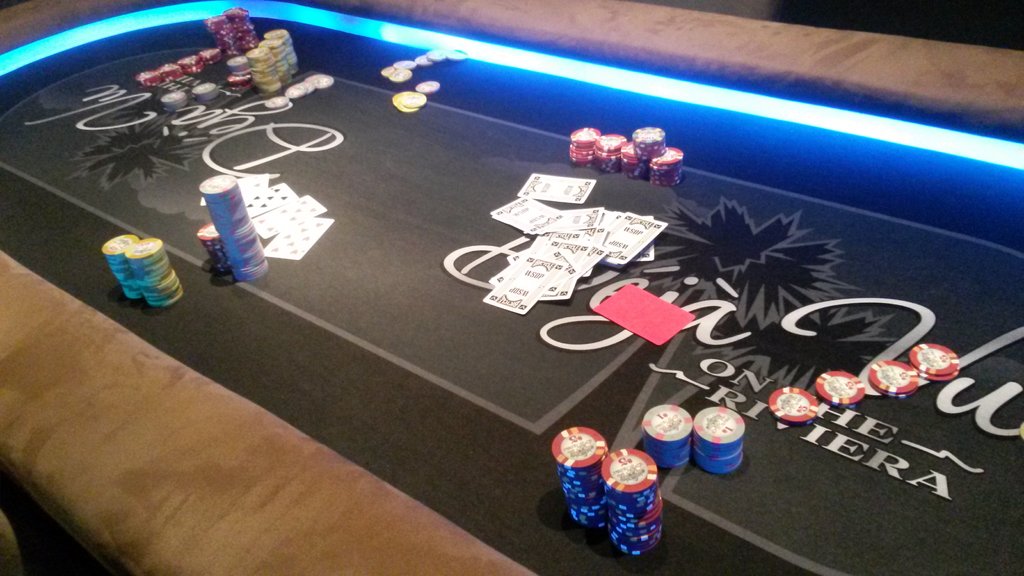
Support needed: Poker Table with padded rail (1 Viewer)

Mr Hanky

Pair
Joined
Nov 8, 2014
Messages
240
Reaction score
280
Location
Here and there...
Hi PCF Members
I am planning to build my second poker table with a padded rail and i need some support on building the rail.

1. what's the best leather / faux leather to use (e.g. backside w/wo cloth; thickness; etc.)
2. which thickness of foam would you suggest is the best?
3. do you glue the faux leather on the foam or are you simply staple it?
4. any good tips are welcome

Thanks for your support in a advance.
Best
Mr Hanky
 
I've built two tables but by no means am a pro.

The material I used for the rail included a wood cutout covered in standard carpet foam, wrapped in marine vinyl which is then stapled on the underneath side.

Note: it's important to double-up the vinyl and/or use a doubled-up ribbon when stapling as to avoid the material ripping over time. I think the ribbon material has a name like "flashing" or something, can't recall it at the moment.
 
Thanks, through the link from RowdyRawhide I found the sister site mentioned above.
Seems that there is a lot go resources there.
Thanks guys!
 
You probably remember my table..

I used 1 inch volara (spelling?) foam for the base playing surface. Best decision ever. its firm yet just forgiving enough to be able to shuffle chips easily and feel good all around

I am very happy with the buckskin suede rail covers I used. Its from Joannes fabrics in the US I think. soft and looks good
Badass table!:cool:
 
You probably remember my table..

I used 1 inch volara (spelling?) foam for the base playing surface. Best decision ever. its firm yet just forgiving enough to be able to shuffle chips easily and feel good all around

I am very happy with the buckskin suede rail covers I used. Its from Joannes fabrics in the US I think. soft and looks good

Looks great. My table will be a table top only. Therefore no chance to integrate leds as it will be to high [emoji51]
 
I used 1 inch foam for rail. No glue. Got materials from auto trader's. I used vinyl and it feels great. Have one other table with leather and really, it's so close that I would stick with the cheaper stuff.

IMG_2395.JPG
 
That's a really beautiful table. Nice color combos and an very nice cloth. Is it from chanman?

Thank you! J5 did the design and Chanman printed it for me. They are both great to work with. I couldn't be happier!
 
Thank you! J5 did the design and Chanman printed it for me. They are both great to work with. I couldn't be happier!

Chanman is also the way to go for me, but i am actually struggeling with the layout as i am unsure how to align everything.

Could you - probably [emoji4] - let me know the dimensions you choose? Distance from rail to betline and insides of the betline...etc? That would be great and very appreciated as it seems to be working perfect. Each player seems to be comfortable and space for cards + pott looks working great as well. No squeezing, just perfect.
 
Chanman all the way. I started another thread where I broke down the costs. Unless you already have the tools and know what your doing, you cannot do it cheaper and get a nicer table than what Tony can make.

Where are you located because if shipping doesn't kill it, i would go Chanman all the way.
 
Chanman is also the way to go for me, but i am actually struggeling with the layout as i am unsure how to align everything.

Could you - probably [emoji4] - let me know the dimensions you choose? Distance from rail to betline and insides of the betline...etc? That would be great and very appreciated as it seems to be working perfect. Each player seems to be comfortable and space for cards + pott looks working great as well. No squeezing, just perfect.

From the inner part of the rail to the inner part of bet line is 8 inches. The light purple section in the middle is 18.5 inches across. That's 20.5 and 47cm, respectively.
 
From the inner part of the rail to the inner part of bet line is 8 inches. The light purple section in the middle is 18.5 inches across. That's 20.5 and 47cm, respectively.

Thanks a lot bivey!
I am pretty sure that this will influence the complete design of the table (again).
Hope i'fe got enough room...

@mummel:
I've been in contact with chanman some mother ago. Shipping to europe is not a price killer. Was something around 18-20$ which seems OK to me.
I am more afraid about doing the design properly as I am doing it on my own. But thanks to bivey, I am more confident right know.
 
I've built two tables but by no means am a pro.

The material I used for the rail included a wood cutout covered in standard carpet foam, wrapped in marine vinyl which is then stapled on the underneath side.

Note: it's important to double-up the vinyl and/or use a doubled-up ribbon when stapling as to avoid the material ripping over time. I think the ribbon material has a name like "flashing" or something, can't recall it at the moment.
ribbon is a good advise. Thanks!!
 
Speaking as a crafter, staples and two people are the only way to ensure even tightness of the cover.

The tightness is the biggest problem on my old table top. The vinyl was stretched good in the beginning, but is now kind of loose. This is why I was asking about glueing on the foam.
 
The tightness is the biggest problem on my old table top. The vinyl was stretched good in the beginning, but is now kind of loose. This is why I was asking about glueing on the foam.

I don't believe gluing would change the stretch over time. Would probably make it harder to re-stretch later.
 
1. My vinyl of choice is whisper vinyl from Spradling, you can get it from yourautotrim.com or if you're a good hunter, you might find a local fabric/vinyl shop that sells it. It's a heavier vinyl with a backing on it with decent stretch. A vinyl without enough stretch is very hard to work with. Foam backed suede is also nice to work with.

2. 1" foam is ideal for the rail. 65lb foam (sometimes referred as 2lb density), high density is what you're after.

3. I wouldn't glue the vinyl to the foam, but I normally do glue the foam to the plywood of the rail. Just the top though, not the sides. It keeps it still and prevents it from sliding around while you're trying to upholster.

4. Tips? Do the upholstery on the floor. Put a knee on the rail, then pull the vinyl with a decent amount of force. After many years of upholstering rails, I still do it on the ground. If you're not straining yourself when you pull, you're not pulling hard enough. Be careful when you do this on the inner part of the rail because it can rip. Do yourself a favor and upholster the outside one day, then do the inside another day so that you don't kill your fingers and your back.

Good luck!

Regarding the custom felt, I don't know if I mentioned but I include 2 hours of design time with any orders, so I can help you with the design and layout.
 
^^ Excellent advice, and exactly how I do it (all four tips).
 
1. My vinyl of choice is whisper vinyl from Spradling, you can get it from yourautotrim.com or if you're a good hunter, you might find a local fabric/vinyl shop that sells it. It's a heavier vinyl with a backing on it with decent stretch. A vinyl without enough stretch is very hard to work with. Foam backed suede is also nice to work with.

2. 1" foam is ideal for the rail. 65lb foam (sometimes referred as 2lb density), high density is what you're after.

3. I wouldn't glue the vinyl to the foam, but I normally do glue the foam to the plywood of the rail. Just the top though, not the sides. It keeps it still and prevents it from sliding around while you're trying to upholster.

4. Tips? Do the upholstery on the floor. Put a knee on the rail, then pull the vinyl with a decent amount of force. After many years of upholstering rails, I still do it on the ground. If you're not straining yourself when you pull, you're not pulling hard enough. Be careful when you do this on the inner part of the rail because it can rip. Do yourself a favor and upholster the outside one day, then do the inside another day so that you don't kill your fingers and your back.

Good luck!

Regarding the custom felt, I don't know if I mentioned but I include 2 hours of design time with any orders, so I can help you with the design and layout.


Hi Chanman
Thanks for your support. It is highly appreciated!
It's good to know that you can help with the artwork. I will do the design on my own, but it is very like that final adjustments are necessary to get it in the required size/dimensions. Artwork can be provided as psd and several vector formats.
I will come back to you during the next 3 monthes i guess.

Again, thanks for the advises.
 
[
I used 1 inch volara (spelling?) foam for the base playing surface. Best decision ever. its firm yet just forgiving enough to be able to shuffle chips easily and feel good all around

Huh? Was this a typo? ;)

Anyway @Mr Hanky, Chanman's rail building advice is solid.

I'd add, to use 1/4" foam for the "play surface", just in case you were considering 1" foam.
 
4. Tips? Do the upholstery on the floor. Put a knee on the rail, then pull the vinyl with a decent amount of force. After many years of upholstering rails, I still do it on the ground. If you're not straining yourself when you pull, you're not pulling hard enough. Be careful when you do this on the inner part of the rail because it can rip. .

You compress the foam that much before stapling? Does it bounce back for a nice padded rail, or stay compressed?
 
@T_Chan said it all above. I would add that covering the rail is IMHO the hardest part of building a table. I would recommend a vinyl that you can stretch a little. It makes it much easier to get the wrinkles out. Last one I did was with Heidi "Super Stretch" from Your Auto Trim. Great stuff
 
Huh? Was this a typo? ;)

Anyway @Mr Hanky, Chanman's rail building advice is solid.

I'd add, to use 1/4" foam for the "play surface", just in case you were considering 1" foam.
oh haha... Im always thinking something is bigger than it is :)

I think I meant 1/4 inch Volara haha


OH and Chanman cloth IS the way to go 100%. Its amazing stuff
 
You compress the foam that much before stapling? Does it bounce back for a nice padded rail, or stay compressed?
Yep, and it expands to create a nice tight rail with no wrinkles and just the right amount of give. Also helps with consistency over the entire rail.
 
Yep, and it expands to create a nice tight rail with no wrinkles and just the right amount of give. Also helps with consistency over the entire rail.
Thanks! I am glad I saw this as I would not have thought to compress the foam before stapling.
 
Thanks! I am glad I saw this as I would not have thought to compress the foam before stapling.
Slightly off topic, but this is also why when installing a car seat you're supposed to put your weight into the base or car seat as you tighten the straps (a strategically placed knee as you pull up on the straps works well). When you release your weight the foam in the vehicle's seat will decompress to take up any slack in the straps. You'll have a very firm installation. Otherwise you can pull on the straps until you're blue in the face and the seat will still flop all over the place once the kid sits in it. I also recommend putting down a folded over towel first to protect the upholstrey.
 

Create an account or login to comment

You must be a member in order to leave a comment

Create account

Create an account and join our community. It's easy!

Log in

Already have an account? Log in here.

Back
Top Bottom