Here are a few of the tables I have made in Australia over the last 20 years.
After having the same table for the last 15 years (green cloth raised rail) I decided to build a new one. I needed to down size as the green table was a little to big for the space it was in (after we moved 10 years ago lol). I downsized to a 180cm x 120cm (70inch x 47inch) which is a great size for the room I have, and it can seat 8 if needed, but seats 6 very comfortable. I love the simplicity of the grey cloth, black raised rail, black skirting and legs. Options are pretty limited in Aus for cloth so I might have to splash out and upgrade to a custom cloth in the near future. Ill probably upgrade the chairs in the near future also.
I also made several carts to go with it, after seeing @justsomedude post from back in 2016, and have removed my shuffletech out of the green table and installed it into a drink cart. I'm still deciding if I'm going to put wheels on them or not.
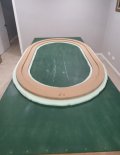
The red round table was one of my favourites to play on years ago, but just needed one a little bigger for a bit more space. I hate the look of seams in the rail and couldn't be bothered trying to stretch the vinyl over a larger round table so had to settle with the 180 x 120 lol.
Enjoy


After having the same table for the last 15 years (green cloth raised rail) I decided to build a new one. I needed to down size as the green table was a little to big for the space it was in (after we moved 10 years ago lol). I downsized to a 180cm x 120cm (70inch x 47inch) which is a great size for the room I have, and it can seat 8 if needed, but seats 6 very comfortable. I love the simplicity of the grey cloth, black raised rail, black skirting and legs. Options are pretty limited in Aus for cloth so I might have to splash out and upgrade to a custom cloth in the near future. Ill probably upgrade the chairs in the near future also.
I also made several carts to go with it, after seeing @justsomedude post from back in 2016, and have removed my shuffletech out of the green table and installed it into a drink cart. I'm still deciding if I'm going to put wheels on them or not.
The red round table was one of my favourites to play on years ago, but just needed one a little bigger for a bit more space. I hate the look of seams in the rail and couldn't be bothered trying to stretch the vinyl over a larger round table so had to settle with the 180 x 120 lol.
Enjoy
 . I got rid of the top and gave the legs and skirting a bit of a sand and some black paint and they came up great. Here are the photos from the FB marketplace add.