OP
OP
Johnblue
Flush
A little too deep, I think with these labella you really don’t need all that much, just get past the stamp bit. Overall I went too deep.


A little too deep, I think with these labella you really don’t need all that much, just get past the stamp bit. Overall I went too deep.
I’ll take you up on it man. I would love a machined top plate, basically like the top piece of rubber, but thinner than a chip, something perfectly sized to sandwich into the two pieces of rubber I have. to hold the chip snug. The rubber gives, even if just a slight MM for a split second, but I can feel the chip jerk a bit and if it were machine sized and harder... I tried to Xzaxto a piece of thin hard plastic to put in the middle, but even on the third try it just wasn’t perfect enough to actually help.I can machine anyone a fixture out of billet alum. if anyone is interested I could also make it with a different top plate for different size chips.
Finally got around to do some more milling today and I tried some different jigs this time but went back to my original jig which proved the most efficient and least likely for failure. Basically it is just a drilled out piece of thin wood the same circumference as a 39mm Chip. I then sandwhich a thin piece of silicone in between another piece of wood. This gives enough grip that I don’t even need to brace the chip with a tool which I had started out doing.
@The Nuts Also the Magnate bit seemed to produce completely flat results for me. No nipple in the middle of the chip etc. The best of the three brands I have tried.
Here is a video milling a couple chips in a row so you can get a sense of the speed as well as a close up of a chip at the end. I am little faster than this when I am not holding a phone in my other hand. I up to about 2-2.5racks/hr once I have the jig aligned perfectly.
Oh, I also don’t recommend sticking your hand this close to a spinning bit but I had been doingthis for quite a while and was confident doing it for some small stretches of time. No need to warn me.
Some murder bathed in Paulson blood...
View attachment 376320
Loving the cardboard box idea!! So helpful.
how did you drill the 39mm hole in the wood?
Wow! Looks like a great set up there. Thanks for posting the video. I had no idea you could mill a chip that quickly.Finally got around to do some more milling today and I tried some different jigs this time but went back to my original jig which proved the most efficient and least likely for failure. Basically it is just a drilled out piece of thin wood the same circumference as a 39mm Chip. I then sandwhich a thin piece of silicone in between another piece of wood. This gives enough grip that I don’t even need to brace the chip with a tool which I had started out doing.
@The Nuts Also the Magnate bit seemed to produce completely flat results for me. No nipple in the middle of the chip etc. The best of the three brands I have tried.
Here is a video milling a couple chips in a row so you can get a sense of the speed as well as a close up of a chip at the end. I am little faster than this when I am not holding a phone in my other hand. I up to about 2-2.5racks/hr once I have the jig aligned perfectly.
Oh, I also don’t recommend sticking your hand this close to a spinning bit but I had been doingthis for quite a while and was confident doing it for some small stretches of time. No need to warn me.
Some murder bathed in Paulson blood...
View attachment 376320
Wow! Looks like a great set up there. Thanks for posting the video. I had no idea you could mill a chip that quickly.
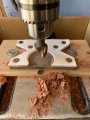
What size hole saw?Okay, different iteration, still used some rubber, but took your advice and today I was rocking a barrel in 7 minutes. This is my test rack and I had never used a drill press before. Here’s what I ended up with....
I think the drill chuck is a little wobbly, I tried to set it a couple different times, but I just think this cheap drill press is going to have some run-out. I think I can live with this though, I’m going to take the chips home and test the labels with this.
next time I’ll have a little paint brush with me, so brush out that fine dust collecting in the recess. It makes a difference to clean it out. Enough dust collects in the back to raise the chip and make my work deeper in the back where the is.
my top layer is actually a piece of 1/8 sign plastic. It’s not “hard plastic” I think it’s a pvc of sorts. But I took advice from @Eloe2000 and used a hole saw bit and then sanded it large enough. It has some bite and the chip clicks in.
cardboard box, game changer.
I no longer fear my mission of doing 4000 chips.
I am looking at a solid 25-30 real hours of work.
I can do it.
View attachment 378690View attachment 378686View attachment 378687View attachment 378691
What size hole saw?
Looks great! How do you center the jig on the bit?
Okay, different iteration, still used some rubber, but took your advice and today I was rocking a barrel in 7 minutes. This is my test rack and I had never used a drill press before. Here’s what I ended up with....
I think the drill chuck is a little wobbly, I tried to set it a couple different times, but I just think this cheap drill press is going to have some run-out. I think I can live with this though, I’m going to take the chips home and test the labels with this.
next time I’ll have a little paint brush with me, so brush out that fine dust collecting in the recess. It makes a difference to clean it out. Enough dust collects in the back to raise the chip and make my work deeper in the back where the is.
my top layer is actually a piece of 1/8 sign plastic. It’s not “hard plastic” I think it’s a pvc of sorts. But I took advice from @Eloe2000 and used a hole saw bit and then sanded it large enough. It has some bite and the chip clicks in.
cardboard box, game changer.
I no longer fear my mission of doing 4000 chips.
I am looking at a solid 25-30 real hours of work.
I can do it.
View attachment 378690View attachment 378686View attachment 378687View attachment 378691
Yeah you can see how I have like a second lip around the edge I think that’s where it’s off. Yes it’s the harbor freight drill and it does totally wobble. I can feel it in the Chuck that it’s off-center somehow. I put the chuck on three times hoping It was just misaligned. I know it’s not the bit because it happens with every other bit as well just off by like a Millimeter or two tried all the different adjustments on there To tighten it up but nothings helpingdamn, and I assume you have tightened everything up and tried to determine the source of the wobble? Is this the cheap Harbor Freight press? If so that is the one I am using and not getting that run out like that.
How'd you get my custom chip?!?I just ended up using a three tooth lathe wheel as my jig. Tried it today and it's pretty dang good! View attachment 396377
Barrie sent me some. Not being milled tho. Those shall be the Starburst and Karl's....How'd you get my custom chip?!?
I just ended up using a three tooth lathe wheel as my jig. Tried it today and it's pretty dang good! View attachment 396377
No clue! I just know it works. Milled a few thousand to it, it's not perfect or nearly as good as CDC, but it centers it automatically and gives me some adjustment ability for other sized chips.How did you attach this to your press?
Do you still feel it's the best option you've tried?
Yes - some chips get really lightIs there a lot of weight loss? Does the new label make up for any of the loss?
Thanks
thanks!Yes - some chips get really light
Not really.... It's too minimal
The goal is to just remove enough to let the new label sit in. I have found if you go a hint too deep, you can't add material, but you can place a second inlay to bump it up.
How are you cleaning up that center bump? I used the non blade edge of a utility knife to scrape it down.Barrie sent me some. Not being milled tho. Those shall be the Starburst and Karl's.... View attachment 396381
Exacto knife.How are you cleaning up that center bump? I used the non blade edge of a utility knife to scrape it down.