bsdunbar1
4 of a Kind
I haven't seen many complete table build threads for a while so i figured I would throw this up here. This table build is not much different than a typical round table, with the exception of the trim ring around the bottom. None the less, I’ll share the build for anyone interested.
The objective of the build was to build a round table to fit over the top of an existing glass octagon dining table.
The first step was to make a trim ring to fit the bottom of the poker table so when it is placed on the dining table it sits securely in place, centered, supported, etc. The dimensions of the octagon table would determine the final size of the round poker table. This would make this table approx. 62”. A bit larger than the ideal round table but the functionality to fit over the existing dining table was the #1 priority.
The trim ring was made and fitted to make sure it would fit the exact dimensions of the octagon. I made it large enough that I could keep the inside octagon shape and also cut a round outer shape. Once the inside dimensions were correct it was time to cut out the ring.

My Lewin router jig was not large enough to cut a 62” diameter circle so I had to make a jig. It's not sexy, but it did its job in guiding a round circle.

The outer diameter was cut and I had my trim ring for the bottom of the poker table.

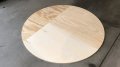
The playing surface was going to have to be pieced together since it was 62” diameter. I had a bunch of cut out pieces from other oval tables so it was time to put them to good use. If I would have started with 2 fresh sheets I could have made this in 2 pieces, but using prior scraps resulted in doweling 4 pieces. Once doweled together it would all be the same anyways.


For the rail instead of piecing sheets of plywood together I made an octagon with 12" wide pieces to cut out my 6” rail. I doweled the pieces together and used my same highly advanced circle jig to cut the inside and outside diameters of the rail.


With the rail & playing surface cut it is time to install the t-nuts which will hold it all together. (No pics, but had to install the trim ring while lining this all up because the bolts/t-nuts will bolt together the trim ring, playing surface & rail)
T-nuts installed lining up all three pieces. The trim ring is not installed in this pic, once I drilled the holes for the bolts I left the trim ring out of the way until I needed it. I didn't want to take the chance of damaging the joints moving it around unnecessarily.

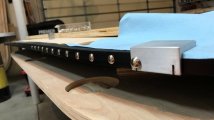
T-nuts installed, now it is time to cut the cup holder holes. Cup holder holes are made easy with the jasper jig.


Time to glue on the cup holder rings.

That pretty much concluded the construction part of the build. I prefer the woodwork part of the build but the upholstery is pretty much a necessary evil I guess.
T-Chan printed us a cloth. The center graphic is not my favorite but I really do like the outer diameter design with the suits, the stripes, and it all fading to black around the outside.

I put black felt on the underside of the playing surface since this will be sitting directly on the glass dining table top. The jumbo cup holders won’t stick through the bottom of the table so I left the felt cover the holes. Once the bottom trim ring is attached it should have a nice clean look with no cup holder holes exposed.

Playing surface foam & cloth installed


A test fit/sneak peek with the rail. Those stripes and the fade turned out really cool.

Back to the trim ring –
It was painted black and edge banded with decorative nails installed.
The very first time I tried installing decorative nails I knew I would never be able to get them exact enough so at that time I made a little jig to get the spacing exact and to keep the nail centered on the ¾" edge.

This is a different table, but a close up of my jig.

Because of the diameter of the table I also had to piece together the rail foam. Many good suggestions/ideas were given on how to try and get this done in one piece but @ 62" I couldn't find a way to make it work. I think it will be irrelevant anyways because I put the 2 seams down the middle of the cup holders. 1) Minimal exposure, 2) Your arm will never be resting on the seam to feel anything any different.

Rail completed. Foam seam looks and feels fine, it is out of the way with the cup holders. I may have been more concerned with this seam if I didn't have the cup holders to "camouflage" it, but none the less it turned out fine.

Rail flipped over and the playing surface lined up and installed

Bottom trim ring installed with connector bolts

And the finished product


The objective of the build was to build a round table to fit over the top of an existing glass octagon dining table.
The first step was to make a trim ring to fit the bottom of the poker table so when it is placed on the dining table it sits securely in place, centered, supported, etc. The dimensions of the octagon table would determine the final size of the round poker table. This would make this table approx. 62”. A bit larger than the ideal round table but the functionality to fit over the existing dining table was the #1 priority.
The trim ring was made and fitted to make sure it would fit the exact dimensions of the octagon. I made it large enough that I could keep the inside octagon shape and also cut a round outer shape. Once the inside dimensions were correct it was time to cut out the ring.
My Lewin router jig was not large enough to cut a 62” diameter circle so I had to make a jig. It's not sexy, but it did its job in guiding a round circle.
The outer diameter was cut and I had my trim ring for the bottom of the poker table.
The playing surface was going to have to be pieced together since it was 62” diameter. I had a bunch of cut out pieces from other oval tables so it was time to put them to good use. If I would have started with 2 fresh sheets I could have made this in 2 pieces, but using prior scraps resulted in doweling 4 pieces. Once doweled together it would all be the same anyways.
For the rail instead of piecing sheets of plywood together I made an octagon with 12" wide pieces to cut out my 6” rail. I doweled the pieces together and used my same highly advanced circle jig to cut the inside and outside diameters of the rail.
With the rail & playing surface cut it is time to install the t-nuts which will hold it all together. (No pics, but had to install the trim ring while lining this all up because the bolts/t-nuts will bolt together the trim ring, playing surface & rail)
T-nuts installed lining up all three pieces. The trim ring is not installed in this pic, once I drilled the holes for the bolts I left the trim ring out of the way until I needed it. I didn't want to take the chance of damaging the joints moving it around unnecessarily.
T-nuts installed, now it is time to cut the cup holder holes. Cup holder holes are made easy with the jasper jig.
Time to glue on the cup holder rings.
That pretty much concluded the construction part of the build. I prefer the woodwork part of the build but the upholstery is pretty much a necessary evil I guess.
T-Chan printed us a cloth. The center graphic is not my favorite but I really do like the outer diameter design with the suits, the stripes, and it all fading to black around the outside.
I put black felt on the underside of the playing surface since this will be sitting directly on the glass dining table top. The jumbo cup holders won’t stick through the bottom of the table so I left the felt cover the holes. Once the bottom trim ring is attached it should have a nice clean look with no cup holder holes exposed.
Playing surface foam & cloth installed
A test fit/sneak peek with the rail. Those stripes and the fade turned out really cool.
Back to the trim ring –
It was painted black and edge banded with decorative nails installed.
The very first time I tried installing decorative nails I knew I would never be able to get them exact enough so at that time I made a little jig to get the spacing exact and to keep the nail centered on the ¾" edge.
This is a different table, but a close up of my jig.
Because of the diameter of the table I also had to piece together the rail foam. Many good suggestions/ideas were given on how to try and get this done in one piece but @ 62" I couldn't find a way to make it work. I think it will be irrelevant anyways because I put the 2 seams down the middle of the cup holders. 1) Minimal exposure, 2) Your arm will never be resting on the seam to feel anything any different.
Rail completed. Foam seam looks and feels fine, it is out of the way with the cup holders. I may have been more concerned with this seam if I didn't have the cup holders to "camouflage" it, but none the less it turned out fine.
Rail flipped over and the playing surface lined up and installed
Bottom trim ring installed with connector bolts
And the finished product