Barrington poker table thread (4 Viewers)

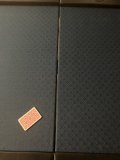
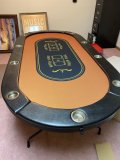
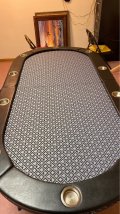
All right got the Barrington re-felted and put back together. I really like the way it came out and LOVE the deeper cup holders. Thanks so much to everyone who contributed to this thread, made my life so much easier. Here are a few pics...

Well done! Yes - the deeper cup holders are a big upgrade.
 
So I just had a vision...

would it be insanely impractical to have @T_Chan build a rail for the Barrington? I have no easy way to saw out holes for jumbo cup holders, and I kind of want to do a custom felt anyway. Would it be insane to have a rail with no cup holders made and I can just use slide-ins? Should I just get a new table at that point?
That sounds like it might be more expensive it’s worth. You can try reaching out to @FrankL333 to see if he could build you a rail. He is located in NY. You could also ask him for a price for a whole new table. You would probably have to arrange to pick it up or ship it since he is on the Island. His website is https://www.tlcpokertables.com/
It looks like he does great, quality work. He is currently building my table so I give you personal feedback in a few weeks.
Always an option. Thanks for the info—is local degens gotta support each other
 
So unfortunately there was no real avenue for me to hole saw through the plywood, since a) I was doing the upgrades in my office lol and b) I don't have access to a hole saw. I thought I lucked out and found some unicorn cupholders that were deeper than the originals without popping up, but I was sorely mistaken--I mismeasured :(

If anyone has a line on gold shallow cupholders, I'd pick 10 up in a heartbeat though... Don't think I'll be getting deeper cupholders til the next refelt, and that'll be a while.

EDIT: upgrades not repairs
Gonna redo mine and toss the old ones. Not sure if you still need these let me know
 
For those looking at these for price drops seems that prices are staying pretty high this time around. Haven't seen any movement on pricing at least through Walmart on these this season. :(

barrinton2.jpg


Maybe some post Christmas pricing will happen.
 
For those looking at these for price drops seems that prices are staying pretty high this time around. Haven't seen any movement on pricing at least through Walmart on these this season. :(

View attachment 585983

Maybe some post Christmas pricing will happen.

Wow - it was just $190 last week (pre-Thanksgiving). Don’t know if it’s worth more than $200 before upgrading.

Bummer.
 
Wow - it was just $190 last week (pre-Thanksgiving). Don’t know if it’s worth more than $200 before upgrading.

Bummer.
I think this is a great buy for around $200. Some minor upgrades (SSC and cupholders) for around $60ish and you have yourself a solid table that is easily stored. I don’t think anyone would be disappointed with it.
 
I think this is a great buy for around $200. Some minor upgrades (SSC and cupholders) for around $60ish and you have yourself a solid table that is easily stored. I don’t think anyone would be disappointed with it.
I agree. I paid $200 for one and spent about that much on upgrades and it works perfectly. This is especially true as someone who has to take it down and store it after every game and who also doesn’t have easy access to the tools or time needed to make one myself.
 
Wow - it was just $190 last week (pre-Thanksgiving). Don’t know if it’s worth more than $200 before upgrading.

Bummer.

I think this is a great buy for around $200. Some minor upgrades (SSC and cupholders) for around $60ish and you have yourself a solid table that is easily stored. I don’t think anyone would be disappointed with it.
I don’t think it’s worth it at $200. My max is ~$160 and even that’s high as I’d like to be around $200 all in. It’s not the best built thing and it will take some bumps setting it up and moving it. I have had a bunch of chips in the edges, easy fix with flat black spray paint. But everyone has different factors to consider.
 
For those looking at these for price drops seems that prices are staying pretty high this time around. Haven't seen any movement on pricing at least through Walmart on these this season. :(

View attachment 585983

Maybe some post Christmas pricing will happen.
Right, didn’t they go down below $90 a couple of years ago, after Christmas? I’m still kicking myself for not grabbing one at that price, just to have as a spare.
 
I think it definitely comes down to your priorities for sure. I agree, the quality isn’t amazing, but for the trips it takes from my office to the living room once a week I haven’t seen any damage to it and don’t anticipate any. It would be a much better value under $200, but for me the convenience offsets the extra I paid.
 
I think it definitely comes down to your priorities for sure. I agree, the quality isn’t amazing, but for the trips it takes from my office to the living room once a week I haven’t seen any damage to it and don’t anticipate any. It would be a much better value under $200, but for me the convenience offsets the extra I paid.
Admittedly my chips came more from the build process that took over a year.
 
Got this done yesterday:

IMG_20201203_152447.jpg


Upgrades:
  • Black Suited Speed cloth
  • 1/4" "Ensolite" playing surface
  • 2 1/4" cup holders
All things considered it fits my needs at a price point I am more than comfortable with. Thanks for everyone's posts. Made this process much simpler for a beginner DIYer like myself!
 
Got this done yesterday:

View attachment 586021

Upgrades:
  • Black Suited Speed cloth
  • 1/4" "Ensolite" playing surface
  • 2 1/4" cup holders
All things considered it fits my needs at a price point I am more than comfortable with. Thanks for everyone's posts. Made this process much simpler for a beginner DIYer like myself!
That came out awesome! Nice job
 
All things considered it fits my needs at a price point I am more than comfortable with. Thanks for everyone's posts. Made this process much simpler for a beginner DIYer like myself!
This sums up the various discussions in this thread nicely.
  • Great info throughout to help PCFers upgrade.
  • Whatever the price point, as long as you are comfortable with it, that’s all that matters.
(I recall picking mine up for around $110 last year.)
 
Thanks to all the advice in this thread, I went ahead and re-felted my Barrington table (which I had bought before even knowing this forum existed) last weekend. Got a custom felt and decided to upgrade the cupholders as well. Pics of the process and final table below. Overall took me just over a day, working all by myself.

A couple things to note (on top of the advice already presented):
- Labeled everything with painters tape, so nothing could get out of place
- Decided to cut the holes for the cupholders before putting on the custom cloth (see post above)
- The hairdryer was key in softening up the glue under the cupholders. Found the by putting a screwdriver/chisel under the rail and putting the hair dryer on the metal worked best
- Spent a long time trying to get the felt to line up; pretty pleased with how it turned out, but definitely not 'perfect'
- Ended up using a pipe-cutting tool to cut the legs. I started off with my Dremel and some cut discs, but burned through 5 of them and only got through 1.5 legs. Got the pipe cutting tool for like $12 (basically the cost of another set of cut discs) and was able to trim the legs in about 5 min. For anyone adding the cupholders, I'd recommend it.
- Found it much easier to cut out the felt under the table to re-insert the hardware (no pics of that).

Finally - thanks to everyone that posted previously. Seeing your work and descriptions definitely made this possible.

View attachment 490667

View attachment 490668

View attachment 490669

View attachment 490670

View attachment 490672

View attachment 490673

Finished Product...

View attachment 490687

View attachment 490678
How did you get a seemless middle? Mine has a huge gap I’m thinking because I didn’t pad the middle where it joins I padded the top where the table starts. Any tips on how to make it less would be helpful here’s a pic of mine
 

Attachments

  • FF62FCBA-CF62-4018-ABE6-429AC189EFD5.jpeg
    FF62FCBA-CF62-4018-ABE6-429AC189EFD5.jpeg
    123.3 KB · Views: 189
I did:
1) to edge of the rail and not under it. The foam armrests will not sit correctly with larger foam

2) just to the edge of the table, not into the crease

Photo below...I was sloppy with tucking the vinyl on that rail piece but the foam under the playing surface came out really well
View attachment 499146
Any tips or suggestions my center has a gap and I see you foamed to the edge and not past the crease. I’m not sure as to why my gap is so big.
 
How did you get a seemless middle? Mine has a huge gap I’m thinking because I didn’t pad the middle where it joins I padded the top where the table starts. Any tips on how to make it less would be helpful here’s a pic of mine

Can you send pics of the bottom of the table?

My initial guess is that table wasn't flush when you put the hinges back on, and so the hinges are creating the gap.
Maybe take off the hinges that hold the table together, clamp the two sides together so they are tight, and then reapply the hinges?

More pics would be useful.
 
Hey all! Do you guys have any knowledge about such poker table available in Europe?

Thanks in advance
 
You can go right through the SSC. Make sure the hole saw is past the padded rail, but above the SSC. Your drill bit should be centered up nicely and in contact with the SSC/table. Start your drill before contacting the SSC. Apply continuous pressure through the table. Couple of seconds per cup holder. Watch the 4 corners as the table legs support is just under those. You'll need to trim about 1-1.5 inches off those to make room for the cup holders in those spots. Check @Regularjohn 's posts just above.
Coming back to this, I’m afraid it will pull the SSC I installed as I don’t feel like refelting it again. No worries about that happening?
 
Coming back to this, I’m afraid it will pull the SSC I installed as I don’t feel like refelting it again. No worries about that happening?

I installed my SSC first before drilling bigger holes for cupholders. I was afraid of pulling the SSC from the staples too, but it was a fairly clean cut. There is a bit of a tug when first coming into contact with the SSC, but that's why you need to start the drill before the hole saw teeth comes into contact with it and keep continuous pressure through the table. The drill bit extends beyond the teeth of the hole saw, so you should be able to center up and start stable.

Of course, I'm not in your shoes, so your attempt/experience may differ from mine. Hopefully, a few others who have done this method can chime in with their (successful) attempts and their thoughts.
 
Thanks. Yeah I tried to accommodate for the cup holders but there’s a a few holes where the SSC felt is in the cutting range.
 
I cut the holes for the deeper cup holders before replacing the SSC so I didn’t have to worry about damaging it. If the cloth is already installed you can staple it around where the cup holders are. Then use a box cutter to remove the excess over the cup holders so you don’t have to use the saw on the cloth.
 
Did my refelt on Monday. Pretty happy with it. Plan to do deeper cupholders and add some handles for easier table handling.

This thread was clutch city in the process.
 

Attachments

  • 64C7DDD9-C5E5-4E50-BDA2-5179D1853838.jpeg
    64C7DDD9-C5E5-4E50-BDA2-5179D1853838.jpeg
    146.7 KB · Views: 235
  • EC7FE1ED-6C5E-4824-B415-52645AB932E9.jpeg
    EC7FE1ED-6C5E-4824-B415-52645AB932E9.jpeg
    302.8 KB · Views: 242

Create an account or login to comment

You must be a member in order to leave a comment

Create account

Create an account and join our community. It's easy!

Log in

Already have an account? Log in here.

Back
Top Bottom