How the heck do you cut a super-ellipse? (1 Viewer)

Some math wizard might know how to rig up a combination of strings and nails to plot a super-ellipse with a pencil… Which could then be turned into a jig.

A basic ellipse is drawn with just two points and a string, with the dimensions determined by how far apart the nails are and how much play is on the string:

Wouldn't take much effort to build a simple 48" long jig with holes drilled 1" apart (that could each hold the second 'nail', aka dowel/pin). One end is nailed to the centerpoint of the table, and then it's just a matter of placing the pin at the right hole location to maximize length, and then setting the string length so that the pencil doesn't leave the 48"x96" dimensions of the table.

Could even scale it down to a 4" x 8" piece for a test run.
 
Last edited:
So I’m thinking that maybe the best way to get a clean, smooth, accurate and repeatable cut is to get the CNC shop to cut two templates out of Lexan (one for the rail top, one for the rail bottom). As long as I can get that done for a reasonable cost.

Then I can use a router with a guide bushing to cut the pieces (CCW outside cut, CW inside cut). I’ll have to adjust a few 16ths of an inch to compensate for the thickness of the bushing sleeve.

It will also allow me to make an additional identical table shape in the future, or I can rent it out to anyone interested in making one the same size and shape.

Or I could learn how to use a jigsaw properly…

:confused
 
Wouldn't take much effort to build a simple 48" long jig with holes drilled 1" apart (that could each hold the second 'nail', aka dowel/pin). One end is nailed to the centerpoint of the table, and then it's just a matter of placing the pin at the right hole location to maximize length, and then setting the string length so that the pencil doesn't leave the 48"x96" dimensions of the table.

Could even scale it down to a 4" x 8" piece for a test run.
I’m not sure if I follow that…
 
Or I could learn how to use a jigsaw properly
Or, you could do both. The lexan option would be muy expensivo. You could make your own template from hard-board, which is really easy to shape and fine tune, and once you're happy with it use it as template. Cheaper by a lot than the lexan option, and will build skills and confidence.
 
The lexan option would be muy expensivo...
OMFG, I didn't realize what that stuff costs! Two sheets would cost more than the entire table build, not even including the cost of CNC machining (which I'm now afraid to look to see how much THAT costs).
 
I’m not sure if I follow that…
Did you watch the string video? Instead of string, pencil, and two random nails, envision a 48" long 'yardstick' with a small hole drilled every 1" or 2" (actually, for this purpose, probably only need 2-3 holes located at the opposite end of the primary nail).
 
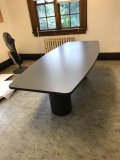
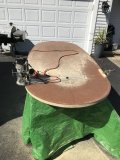
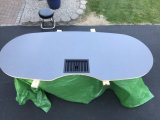
I cheated. I was able to buy a "boat shaped" conference room table cheaper than 1 sheet of plywood. The length already had curves, I just rounded off the ends with my router. Its kind of like a super ellipse.

IMG_2856.JPGIMG_2884.jpgIMG_2887.jpg

More build info can be found here:
https://www.pokerchipforum.com/threads/new-table-build-from-boat-shaped-conference-table.46721/
 
Not sure what jigsaw you’re using, but the quality of the tool can make a HUGE difference in the quality of the cut.
I had a cheap Skil jigsaw for years and recently upgraded to a Bosch. Massive difference in control and ease of making quality cuts.
 
Also another trick is to use painter's tape over the cut area, this is kinda odd, because you just toss tape on the wood approximately where your cut is to be.

Helps with the splintering. and makes a cleaner cut, also helps with vision.
 
While looking for something totally unrelated, I stumbled upon this device, which could actually help solve the problem:

https://www.smartsaker.com/products/saker®-woodworking-profiling-strip

Basically it appears to allow you to nail down a hard plastic guide along a curve that follows your drawn line.

If I understand its use correctly, you then flip the board over and your router follows the guide underneath.

I haven’t actually used this product, but I immediately thought of this thread when I saw it.
 
Last edited:
While looking for something totally unrelated, I stumbled upon this device, which could actually help solve the problem:

https://www.smartsaker.com/products/saker®-woodworking-profiling-strip

Basically it appears to allow you to nail down a hard plastic guide along a curve that follows your drawn line.

If I understand its use correctly, you then flip the board over and your router follows the guide underneath.

I haven’t actually used this product, but I immediately thought of this thread when I saw it.
Brilliant! Just a matter of tracing the curves onto the sheet, screw down the template, and use a bottom bearing pattern bit on your router. Looks like you would need 3 or 4 of these to do the whole table, or just use one and do it section by section.
 
While looking for something totally unrelated, I stumbled upon this device, which could actually help solve the problem:
https://www.smartsaker.com/products/saker®-woodworking-profiling-strip

Basically it appears to allow you to nail down a hard plastic guide along a curve that follows your drawn line. If I understand its use correctly, you then flip the board over and your router follows the guide underneath. I haven’t actually used this product, but I immediately thought of this thread when I saw it.

Brilliant! Just a matter of tracing the curves onto the sheet, screw down the template, and use a bottom bearing pattern bit on your router. Looks like you would need 3 or 4 of these to do the whole table, or just use one and do it section by section.
Thinking about this a bit more, it might be difficult to use this on 3/4" plywood if it is on the bottom. Most articles that I have read say to make multiple passes with the router when cutting thicker and harder material, and obviously this would not be possible with the flexible template on the bottom.

What might work very well would be to use the flexible guide to cut out a template using the bottom bearing pattern bit on 1/4" or 1/8" hardboard, and then attach the hardboard template to the top of the plywood and use a router guide bushing to cut multiple passes from the top down.

Still a great looking product!
 
I guess it depends on what length bit you use, no?
I was assuming a bit with a minimum 3/4" depth cutting surface, but I suppose that if you used a shorter depth bit, then you would have to make multiple passes for sure..

I'm far from an expert, so I may be off track here, but from what I have read, with longer length bits, it is recommended to make multiple passes at increasing depths, rather than do a single pass at full depth. This increases stability of the bit when cutting, decreases heat and wear, and helps with clearing debris from the cutting surface. Hardness of material, feed rate, etc. are also considerations when deciding to do single vs. multiple passes.

But again, IANAE (about as far as you can get from one!). I would be interested to hear what you and others with actual router experience have to say on the matter.
 
The bit I use with my router is long enough to do it in one pass, but I never do. The bit will dull out really quick. Due to heat, build up, strain or what have you. I cut 3/4" plywood in 3 passes. The bit lasts a lot longer.

Measure the distance from your bit to the edge of the router base and place the strip that far away from where you want your cut to be. Then run the router along side the strip.
 
Measure the distance from your bit to the edge of the router base and place the strip that far away from where you want your cut to be. Then run the router along side the strip
Great idea! Those router strips look fantastic, and your suggestion makes it simple to do multiple passes, so this is probably the way I will go.
 
So I'm slowly climbing the learning curve on FreeCAD, and have created a file that shows the plywood sheet outline, outlines of three sizes of standard oval tables (96 x 48/46/44), and an editable set of superellipse cut lines that can be quickly manipulated to adjust width and "n" values.

Here is a 96 x 46 set of cut lines with an "n" value of 2.4. (2" lower rail ring, 5" upper rail ring). I like how the superellipse allows better sight lines.


FreeCAD Drawing 1 .PNG
 
Which size straight cut router but is best for making these cuts? 1/4 inch?
 
Which size straight cut router but is best for making these cuts? 1/4 inch?
Someone who is more experienced can chime in, but I think that if you used a 1/8” bit, there wouldn’t be sufficient room to get the rail vinyl and the table felt into the slot between the lower rail piece and the playing surface piece. You could still just staple the vinyl to the bottom of the lower rail piece, but it would look more finished if you tucked it into the slot.
 

Create an account or login to comment

You must be a member in order to leave a comment

Create account

Create an account and join our community. It's easy!

Log in

Already have an account? Log in here.

Back
Top Bottom