Poker table build thread (1 Viewer)

GavinStevens

Sitting Out
Joined
Sep 25, 2022
Messages
31
Reaction score
43
Location
Alabama
Hello guys. I've been following this forum for a while to get ideas for a table build. I've finally started the project and I'm going to attempt to document the full build for the forum so maybe it will help someone else out. A little background: Woodworking is a hobby of mine but I've not built a table like this before. About 8 years ago, I was going to build one but a friend talked me into building a smaller, octagonal 4-seater type table. It turned out well but I always regretted not building a full table so I ended up trashing it. I've not dealt with upholstery or fabric much at all, so I'm a little apprehensive about that stage of the build. Also, I don't even play poker that much. I enjoy it mainly for the social aspect and I just enjoy building so this seemed like a fun project. If anyone more experienced than me sees something that needs changed/fixed/addressed, let me know - I'm not a pro at this. This build will likely take a few weeks depending on how much free time I have.

A few issues, decisions, and thoughts:
  1. I really prefer the look of a raised rail table from an aesthetic standpoint. In my case, the table will need to be mobile and on foldable legs so it would probably make more sense to build a standard rail table - but after A LOT of consideration, I've decided to proceed with a raised rail because I feel like I will regret not doing it.
  2. As of right now, I don't know exactly what I'm doing for the raised rail. Since it will be mobile, I'm not too keen on having any sort of lights - I just don't see them getting used a lot but I may change my mind. I may go with a solid color strip of material but we'll see.
  3. Cup holders. I like cup holders in the rail. But I have 2 small kids, and of course drunk friends so I envision drinks getting spilled on my new felt. I would sort of prefer no cup holders for that reason. I also considered a pop-out type holder at each seat. This was a really tough decision but I decided to go ahead and put them in the rail (for now). I'm sure a spill will eventually happen but 8 guys having to keep their drinks on the floor doesn't seem ideal either.

The build summary: 95.5" x 44" base size. 10 cup holders. 1" raised rail. Gorilla legs. Custom felt, hopefully from Chanman if he can get to me.

I'm going to keep a material list running. To start, I'm using prefinished 2x sides UV cabinet-grade plywood. This is not necessary, but it is what I keep handy for cabinet projects. I buy my woodworking material and hardware in bulk through distributors so I also pay a MUCH cheaper price when compared to home depot or lowes. For 3/4" prefinished, I paid $44.50 on my last order, the 1/2" was around $38 I believe - so using the higher quality doesn't hurt and I like working with it.

Materials used so far:
  1. 1x 3/4" sheet for the base
  2. 2x 1/2" sheets for the rails and playing surface. - I considered going 3/4" for all of it but it seemed most were recommending 1/2" for the rails and surface to save weight so I went with 1/2".
 
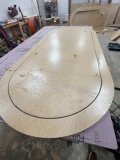
To start, I trimmed the 3/4" plywood for the base. I always start by taking the factory edge off of plywood. This isn't that important, given the nature of the project, but it's my routine for sheet goods. For this reason, my "base" dimensions are 95.5" x 44" since I trimmed the 96" factory edge. To be honest, this wasn't really the plan. After I trimmed it, I realized everyone else was leaving it 96" but I figured .5" wasn't worth getting a new piece out.


IMG_2546.jpg


I use a festool track saw for breaking down sheet goods. Again not necessary - you could just as easily use a circular saw with a straight edge, or even a jigsaw. I start by trimming at least enough to get the blade kerf plus a little - it helps with dust collection.

IMG_2549.jpg


Here the 4" strip came off the width, leaving me with 44".


IMG_2550.jpg


And lastly, we square up the other dimension by taking a small strip - again, I probably wouldn't have even bothered with this if I started over.

At this stage, we have a 95.5" x 44" sheet.
 
Next step was to cut the radius (radii?). I use a spiral-down cut bit in the router. I like Whiteside bits a lot - made in USA =)
IMG_2552.jpg


I have a jig from Woodpeckers that allows you to cut circles but there's a dozen other ways to do this and homemade jigs that work just as well. I made a mark 22" for the centerline of the sheet. and then came in 22" from the edge. That created the starting point. For my jig, you drill a small hole and a pin gets inserted that lines up the jig.

IMG_2553.jpg
IMG_2555.jpg
IMG_2561.jpg
IMG_2563.jpg


Repeat for both sides and this is what the final base sheet looks like.
 
Next step was to make a matching piece in one of the 1/2" sheets. You can just repeat the steps above but I chose to put the completed base on top of the 1/2" sheet and use a flush trim bit to "copy" the template.

Here is the bit I use.

IMG_2569.jpg


Here is a view from the side of the 2 pieces and the router bit.

IMG_2570.jpg
IMG_2571.jpg


I stopped mid-cut so you can see what's happening:
IMG_2611.jpg


And here is the process finished, with the 1/2" laying on top of the 3/4".

IMG_2613.jpg
 
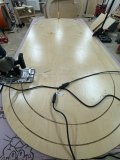
From this freshly cut 1/2", I'm going to cut a 6" rail. That process is much the same as I did above with the radius jig.

I marked 6" from each edge and adjusted the router jig. The center point was still the original center point from the first sheet. I bore it through the 3/4" sheet when the 2 sheets were on top of each other.
IMG_2615.jpg


After doing the two ends, I needed to complete the cut along the sides. You could use a track saw, circular saw with a straight edge or several other methods but I chose to use the router with the edge guide jig for this cut.

IMG_2616.jpg


At this stage, I'm left with a 6" wide ring.

IMG_2617.jpg


I'm not sure this step is necessary but I wanted to cut down the sharp edges. You can just use some sandpaper to knock the edge down but I used a very small round over bit. The piece will get covered with foam and vinyl so I'm not sure this matters but it can't hurt.

IMG_2618.jpg


And this is the finished edge after the very small round over.

IMG_2619.jpg


That's it for night #1. This weekend I will try to cut the remaining pieces.
 
Next step was the cut down the 3rd sheet of plywood into the playing surface, and outside rails. This starts by repeating the process we did for the 2nd sheet of plywood. I put the original 3/4" piece that was cut of the base underneath the new 1/2" sheet and used a flush trim bit to cutout the template.

IMG_2634.jpg

IMG_2635.jpg
IMG_2636.jpg


At this point, we have a matching complete shape at 95.5 x 44". I first drew out the cuts for the playing surface and the outside rail. I also drew out the kerf of the router bit so I wouldn't accidently mess up the cut
IMG_2637.jpg
.

IMG_2638.jpg

IMG_2639.jpg


After cutting the radius cuts at the ends, I switched to the edge guide to cut the sides.
IMG_2640.jpg


IMG_2643.jpg


I wasn't exactly sure how wide the outside rail needed to be. I don't think it has to be too specific but I have noticed others who seemed to make theirs wider than I did. You'll notice the playing surface line is inset slightly from my pencil mark. The pencil mark is the same as the player's rail. I noticed some people recommended insetting 1/8-1/4" inside for the player's rail to overlap the diffuser more so that's what I did there.
 

Attachments

  • IMG_2644.jpg
    IMG_2644.jpg
    166.7 KB · Views: 17
  • IMG_2641.jpg
    IMG_2641.jpg
    161 KB · Views: 21
I ordered a few things today:

  1. From Yourautotrim I picked up:
    1. 1/4" open cell foam for the playing surface. x3 @ $12.95 per
    2. 1" x 54" x 108" 47 lb rail foam x 1 @ $52.88
    3. Black whisper plus vinyl for the player's rail x3 @ 26.25
      1. Total Order was $170.48
  2. From the famous Chanman, I finalized my custom felt order. I was not going to put the price in case he changes sometime soon but I noticed it is listed on his website so I hope he won't mind. It was $265 after shipping all the way across the U.S. Side note: his graphics guy is super fast and very on top of things! Such an easy process.
  3. From amazon, I ordered some LED lights. There's 1000x chinese brands who are probably mostly the same but I went with "DAYBETTER Smart COB LED Strip Light, 32.8 ft" for $36.99. There's some cheaper options but these supposedly "diffuse" more on their own. We'll see.

I'll update the costs in the first post.

Until some of this arrives, I'm mostly at a stopping point.
 
Nothing has changed here, but I stacked the pieces together just to visualize where we are.

base:
IMG_2649.jpg


base + outside rail
IMG_2650.jpg


Base + outside rail + inside rail
IMG_2651.jpg


+ playing surface
IMG_2652.jpg


+ player's rail
IMG_2653.jpg
 
I took 4" off the width of each plywood sheet to cut it down to 95.5 x 44".
I took the 4" 3/4" and the 4" 1/2" and then trimmed a fresh 1/4" sheet to add with it.
I sandwiched the 3 strips together with glue. Then cut them into pieces. This is what I will use for my risers.
IMG_2669.jpg
IMG_2690.jpg


The total height of the riser pieces:
IMG_2691.jpg
 
Awesome build! The documentation is fantastic and gives us a great look at the process. I'm getting ready to start mine, and this is inspiring!
 
I went with an ultra-cautious approach with my build and went with 18mm (3/4") Baltic Birch plywood, which is the cabinet grade (B/BB) type.

My table is designed to come apart so I wanted to ensure there was zero chance of even the tiniest bit of warping and Baltic Birch is the one for that. The fact that it has clean surfaces, no pockets and finishes well is a bonus, and although only my cup holders are visible I do think it was worth the extra. It is quite heavy but solid as a rock.
You’re definitely going to all the limits in a good way. I’ve built 5 or 6 tables in the last year, maybe 10 in the last two. All for resale. 3/4” plywood goes for maybe $30 a sheet, maybe less. I go all out on the dressing; Vinyl, all pad, cloth, and drink holders. You’ll see the continuous LED under the rail on my builds because the recess is there and it’s a selling point. My personal one had 10 USB ports, one at each spot. Super handy but not worth the effort for a reseller.

Anyways, great thread and I’m super jealous of your tools.

You could kick out a great table with monkeywood with tools like that.

Good job.
 
I went with an ultra-cautious approach with my build and went with 18mm (3/4") Baltic Birch plywood, which is the cabinet grade (B/BB) type.

My table is designed to come apart so I wanted to ensure there was zero chance of even the tiniest bit of warping and Baltic Birch is the one for that. The fact that it has clean surfaces, no pockets and finishes well is a bonus, and although only my cup holders are visible I do think it was worth the extra. It is quite heavy but solid as a rock.
I haven’t built a racetrack in years but it goes without saying that you’re dropping $85-100 on that key piece of plywood.
 
I haven’t built a racetrack in years but it goes without saying that you’re dropping $85-100 on that key piece of plywood.

I don't have a racetrack but base, rail, rail support, cup holders and a few other small pieces used 2 full sheets that was CNCed and the UK is more expensive to begin so I spent far more than I'd originally budgeted (lol) for. The sheets were ~£100/120 each I think, then add the CNC to that.

n6l8LR6.png
94X4N86.png
sHWkt6U.jpg


I could have saved a couple of hundred maybe but I'm glad I went for the best quality I could. I did the same with my LEDs, probably going ~£100 more on the set up than if I'd gone as cheap as I could, so quality strip, controller and dimmer, aluminium track and diffuser.


Nice job OP!, not meaning to hijack.
 
Yeah I run a diffuser on mine but on my builds not so much. Because they’re dimmable it’s all good. I didn’t go back far enough to see that multi piece rail. Not a lot of wood wasted with that. It always kills me to have the large centers just sitting around after I get the top sheets ready for the raised rail.

You’ve got the tools too to pull of that complex multi piece. I’m over here rubbing two sticks together with my circular and jig saws while you’re running around with a flamethrower. I’ll be watching for the final outcome.

Good job.
 
The mantra in my table building world is if it’s covered, playwood is plywood. Keep overhead down.
I’ve been trying to find a way to use rigid insulation in place of plywood to keep weight down, and cost is similar to standard cdx
 
I don't have a racetrack but base, rail, rail support, cup holders and a few other small pieces used 2 full sheets that was CNCed and the UK is more expensive to begin so I spent far more than I'd originally budgeted (lol) for. The sheets were ~£100/120 each I think, then add the CNC to that.

n6l8LR6.png
94X4N86.png
sHWkt6U.jpg


I could have saved a couple of hundred maybe but I'm glad I went for the best quality I could. I did the same with my LEDs, probably going ~£100 more on the set up than if I'd gone as cheap as I could, so quality strip, controller and dimmer, aluminium track and diffuser.


Nice job OP!, not meaning to hijack.
Oh!! This is fantastic, I have an Ox CNC machine from OpenBuilds. Would you sell the plans for this?
 
What kind of plywood are you using. I've never been able to find sheets with no knots, patches, etc. and it's so shiny!

It's prefinished. You'll likely have to get it at a cabinet/plywood distributor who typically sells a large variety of plywoods and also cabinet hardware like drawer slides and hinges. The only reason I used it is my cost is so low with the distributor and I keep 10-15 sheets on hand usually for convenience. I pay less for this than I would lesser plywood from a local lumber yard in my area. But it is nicer to work with. The drawback is some of those vendors will require you to register as a business and do a minimum amount of business ($$$) to keep an account open but there are some that are less strict. Your area may be different!
 
Question for those who are more experienced than me - the optional table top attachments that I've seen.... how are those attaching or are they just sitting on the rail foam? Is there some sort of spacer to protect the rails? Is it bad for the foam overtime? I've never seen one in person so I'm not sure what's going on there detail wise.
 
No spacer needed. The weight of the topper gets distributed around the entire rail. I've seen tables that are years old with no signs of any compression after having the topper on for extended periods of time.
 
No spacer needed. The weight of the topper gets distributed around the entire rail. I've seen tables that are years old with no signs of any compression after having the topper on for extended periods of time.
Thanks! I think I'll make a simple plywood top then just so it can have some additional functionality in the game room.

In other updates, my order from YourAutoTrim arrived in less than 24 hours. Apparently I live close to their warehouse. This is the foam, vinyl and the playing surface foam.

IMG_2742.jpg


Also, I was looking over my pieces and realized I had bought my T-nut bolts when I thought the entire build was going to be made from 3/4" plywood. That means I will have some additional protrusion that I didn't want so I ordered some shorter ones today.
 

Create an account or login to comment

You must be a member in order to leave a comment

Create account

Create an account and join our community. It's easy!

Log in

Already have an account? Log in here.

Back
Top Bottom