I haven’t yet landed on something I’m happy enough with.
Well, I spend nearly the entire weekend experimenting with different methods of using the cleaner in the ultrasonic. Cold. Mild heat. Different cleaning times. Pre-soaks in the cleaner. Lots of other details.
Bottom line, so far, is that the chips experience zero or near zero fading, BUT I’m not getting the extra filthy chips completely clean without manual effort (wiping, or toothbrush, dental pick, etc.).
That said, the chips I’m trying to clean are quite possibly the worst of the worst in the chip world.

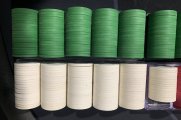
They’re 1975 vintage Fremont $5s and other denoms with gobs of gunk and deeply embedded dirt that’s had nearly 50 years to harden.
View attachment 1342975
The good thing about these difficult test subjects is that if/when I figure out a way to completely clean them without manual effort and without fading, the method will probably work for ANY other dirty chips, at least, the types that are safe to clean (i.e. NOT ASM/
CPC, Ewing, and other chips that in my experience are soluble in just water and mild detergent).
I admit to being a bit disappointed after a weekend of trying without the level of success I wanted, but I have some more ideas to test out in the coming days. I’ll post another update with any news when I have it.
The original ChipCo racks (which are an almost rubbery acrylic that will not crack or break if you drop them, and somewhat cloudy looking) are fine. Real Paulson racks (any vintage) are fine for your oiled chips, too.


 At least, that’s what I tell the wives…
")