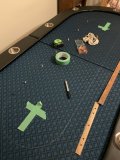
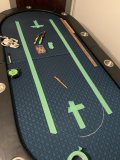
Great work!Permanent marker, masking tape, long straight edge, and a lot of measuring...
I start with the lines parallel to the long rail, then use my ruler as a jig to create the semi-circles at the ends. Masking tape keeps the lines neat when you join the semi-circles to the parallel line.
-
This site contains affiliate links. If you choose to make a purchase after clicking a link, Poker Chip Forum may receive a commission at no additional cost to you. Thank you for your support!
You are using an out of date browser. It may not display this or other websites correctly.
You should upgrade or use an alternative browser.
You should upgrade or use an alternative browser.
Barrington poker table thread (18 Viewers)
- Thread starter SixSpeedFury
- Start date
SaltLakeGambler
Sitting Out
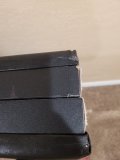
Wow, I did not have issues like that. My only problem has been chipping due to it standing on the flat side.Did anyone else have this issue with their table out of the box? Seems like flimsy screws or they drilled the holes too wide.
View attachment 199359View attachment 199360View attachment 199361
No issues like that, just chipping from standing during storage.Did anyone else have this issue with their table out of the box? Seems like flimsy screws or they drilled the holes too wide.
View attachment 199359View attachment 199360View attachment 199361
Attachments
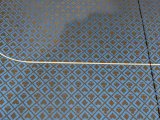
Can we see a closeup pic of the line?Permanent marker, masking tape, long straight edge, and a lot of measuring...
I start with the lines parallel to the long rail, then use my ruler as a jig to create the semi-circles at the ends. Masking tape keeps the lines neat when you join the semi-circles to the parallel line.
Attachments
louBdub
4 of a Kind
World…. Why are you - the way that you are….?

dmoney
Full House
Adding a betting line, day one. Thanks to @JRald07 for the inspiration and tips.
I put a pin in the felt 8.5” from the rail to line things up. Worked on some geometry with @SJFCPK18 to land on the correct radius and “live bet” area.
The high point of the day was fashioning a compass with a set of pliers, putting a pin in one end and the felt marker in the other to make tracing the arc easier!
Hoping to finish up over the weekend!
dmoney
Full House
Looking good!!Good news: compass worked great! I traced out the full line and really liked it!
Bad news: the marker ran out so now I’ll have to get another and re-trace the whole thing, which invites more opportunities for error.
View attachment 877845View attachment 877847View attachment 877846View attachment 877848
dmoney
Full House
All done and I love how this turned out! The marker I used was $4.50 at Walmart. I bought 2 since the first one ran out over the weekend (different brand & store), but one did the trick with plenty to spare. Thanks for the inspiration and pointers @JRald07!
Ready to host a game this weekend, nearly two years since I was planning to host and COVID shut the whole world down.
(Also sneak peek at the Ugly Bicycle Cardroom set, which will get felted for the first time)


Ready to host a game this weekend, nearly two years since I was planning to host and COVID shut the whole world down.
(Also sneak peek at the Ugly Bicycle Cardroom set, which will get felted for the first time)
Could you have just cut a stick to 8.5 inches, put one end against the rail, put a pen on the other end, and just push the stick all the way around the table, following the rail? I guess you'd have to be careful to always keep he stick straight out at a 90 degree angle, but wouldn't that work?
dmoney
Full House
I measured 8.5” from the rail and put pins in the felt - I wasn’t exactly sure how the shape of the live bet area would turn out/be centered, and you really only get one chance to put the fabric paint on.Could you have just cut a stick to 8.5 inches, put one end against the rail, put a pen on the other end, and just push the stick all the way around the table, following the rail? I guess you'd have to be careful to always keep he stick straight out at a 90 degree angle, but wouldn't that work?
I think the arcs at the end would be the most difficult to do with your proposed stick method. Possible, I think, but I’m happy with the process I went through, deliberate/tedious as it may have been.
I had the pins, then lightly traced the line with the compass, then traced that line with the “final” fabric marker, then touched up a few spots.
tabletalker7
Full House
You would have to take the shuffler out to fold up the table. At that point just mount the shuffler in a side cart.Has anyone every considered the shuffle tech flush mount on a Barrington? would there be enough space with the folding legs?
I think that's a disaster waiting to happen. Might work, or might end up looking like crap. Why chance it.Could you have just cut a stick to 8.5 inches, put one end against the rail, put a pen on the other end, and just push the stick all the way around the table, following the rail? I guess you'd have to be careful to always keep he stick straight out at a 90 degree angle, but wouldn't that work?
TonZaga
Straight
I've thought about it as I never fold mine up but eventually decided against an $800 shuffler in a $150 table for now.Has anyone every considered the shuffle tech flush mount on a Barrington? would there be enough space with the folding legs?
I get that. But if it’s folded, I’m not using it so removing the shuffler would be fine. Seems very removableYou would have to take the shuffler out to fold up the table. At that point just mount the shuffler in a side cart.
I've thought about it as I never fold mine up but eventually decided against an $800 shuffler in a $150 table for now.
tabletalker7
Full House
The more unnecessary handling of something, the more it can break.I get that. But if it’s folded, I’m not using it so removing the shuffler would be fine. Seems very removable
A side cart is too easy and too helpful.
TonZaga
Straight
What size cabinet is that? Seems like it would fit everything I need perfectly!The more unnecessary handling of something, the more it can break.
A side cart is too easy and too helpful.
tabletalker7
Full House
https://www.homedepot.com/p/Hampton...itchen-Cabinet-in-Beech-KW1530-UFDF/306576957What size cabinet is that? Seems like it would fit everything I need perfectly!
I put 2 inch casters on the bottom so it will roll around easy.
I misread bottom as button. And that seems like a great idea too.https://www.homedepot.com/p/Hampton...itchen-Cabinet-in-Beech-KW1530-UFDF/306576957
I put 2 inch casters on the bottom so it will roll around easy.
Damn it, now I need one of these.The more unnecessary handling of something, the more it can break.
A side cart is too easy and too helpful.
tabletalker7
Full House
Be warned. It only comes with one shelf. I cut a second one out of lumber I had left over from other crap I was doing at the time.Damn it, now I need one of these.
I have grand visions in my head of making a much smaller version of my cabinet, with a cutout for the shuffler, so that they match.Be warned. It only comes with one shelf. I cut a second one out of lumber I had left over from other crap I was doing at the time.
"But honey it's not to hold more chips, it's to make it quicker to shuffle cards so I can get the players out of our apartment faster!"
dmoney
Full House
Getting off topic from Barrington posts, but I bet @alecnetwoodworks could make a BANGER cabinet with wheels, removable drawers, and house a shuffler. @TX_Golf_N_PokerI have grand visions in my head of making a much smaller version of my cabinet, with a cutout for the shuffler, so that they match.
View attachment 879138
"But honey it's not to hold more chips, it's to make it quicker to shuffle cards so I can get the players out of our apartment faster!"
Yes, I'm sure Alec could make one, but @rjdev7 is quite capable also. I'd love to see Ryan build a shuffler cabinet to match his chip cabinet.Getting off topic from Barrington posts, but I bet @alecnetwoodworks could make a BANGER cabinet with wheels, removable drawers, and house a shuffler. @TX_Golf_N_Poker
kizerman86
New Member
I’m waiting for my ESPN table to be delivered, and am hoping to get some insight from someone with experience modding that version.
I have a game coming up this weekend so I don’t have time to replace the felt yet, but would love to tackle a couple easier mods ASAP before the first game.
Cupholders
I plan on using a hair dryer to remove the cupholders, then using a hole saw (without removing the rail) to cut holes for the deeper cupholders (those Da Vinci cupholders from the Amazon links in this thread, to be exact)
Is this process any different for the ESPN table, since it has the LEDs and a slightly different rail? Or can I just remove the stock cupholders, drill a deeper hole with the hole saw and drop the new cupholders in like others have discussed for the non-ESPN version?
LED Diffuser
Any ideas on a cheap and/or easy way to diffuse the lights, without much cutting/modification? I’m terribly un-handy, and am nervous about messing up the table/rail.
I saw someone mention hot glue sticks, but couldn’t find any photos of that. Any other cheap/easy diffusers that work for the ESPN table?
Where’d you get your espn?I’m waiting for my ESPN table to be delivered, and am hoping to get some insight from someone with experience modding that version.
I have a game coming up this weekend so I don’t have time to replace the felt yet, but would love to tackle a couple easier mods ASAP before the first game.
Cupholders
I plan on using a hair dryer to remove the cupholders, then using a hole saw (without removing the rail) to cut holes for the deeper cupholders (those Da Vinci cupholders from the Amazon links in this thread, to be exact)
Is this process any different for the ESPN table, since it has the LEDs and a slightly different rail? Or can I just remove the stock cupholders, drill a deeper hole with the hole saw and drop the new cupholders in like others have discussed for the non-ESPN version?
LED Diffuser
Any ideas on a cheap and/or easy way to diffuse the lights, without much cutting/modification? I’m terribly un-handy, and am nervous about messing up the table/rail.
I saw someone mention hot glue sticks, but couldn’t find any photos of that. Any other cheap/easy diffusers that work for the ESPN table?
kizerman86
New Member
Where’d you get your espn?
Amazon. It dropped down to $250ish for like 5 minutes so I grabbed it, then it was immediately back up to $400.
I've been looking at craigslist, FB Marketplace, Amazon, etc... for over a month and that felt like the best deal I could find knowing it could be modded pretty easily.
Similar threads
- Replies
- 4
- Views
- 172
- Replies
- 11
- Views
- 373
- Replies
- 21
- Views
- 2K
- Replies
- 12
- Views
- 424
- Replies
- 53
- Views
- 2K


